Life Lately

From Upstate, NY to New Orleans, LA to Jasper, AL. We’ve moved! Again. This time to Jasper, wait no. I’m trying to keep up, we just moved again. In July we moved to Gardendale, a small town outside of Birmingham, Alabama shortening both of our commutes by over half. The Man started flight school in January. About a year and a half from now he will be a fully licensed commercial pilot.

Things have been pretty crazy lately, I think the Man has been home for a total of a month or so since his Annual Training in June. Between that, getting called up for the numerous Police shootings, as well as the disastrous flooding in Louisiana, his time at home has been scarce. On top of all that, he’s been in school full time and organized a large drive for donations to help the flood victims. We took a pickup truck full of supplies down a few weekends ago and are working to fill a tractor trailer to deliver to Baton Rouge Community College. I took a weekend while he was still activated to go organize a quick donation drive at work, to then take down supplies, volunteer at a donation center, and help flood victims begin to clean out their homes.  You can check out those efforts here:

If you would like to help out, you can also do that here:  Donations for Louisiana Flood Victims (All donations will be spent to provide supplies that are most needed at this time.)

To put all of this in perspective here are some photos, some of which I took and others that friends who were affected took. Unfortunately, the majority of the news and circumstances surrounding this flood did not make national news. Also, to clarify, the opinions of some that believe these flood victims chose to lose everything by choosing to live here. This area has never flooded and is in fact, a no flood zone. These images can be hard to look at and are not only worse in person, but it is difficult to wrap your head around exactly what happened and how much water was in these homes.

 Hundreds of National Guardsmen, First Responders, and even civilians, rushed to the aid of the people that didn’t have time to evacuate their homes before they were entirely engulfed by water.

fullsizerender-4

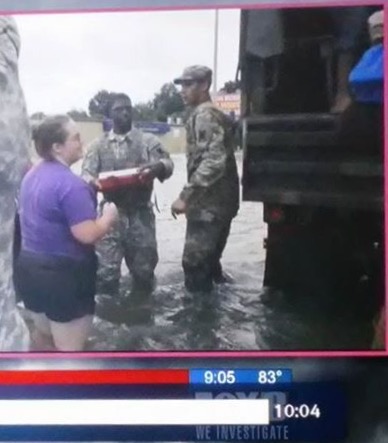
Captured from the Weather Channel News. (The man on the right is actually my Man conducting rescue and recovery missions.)

fullsizerender-3

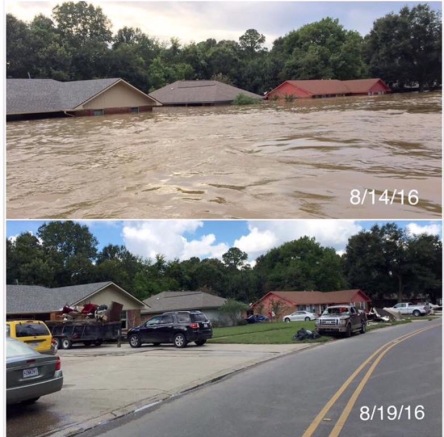
Ponderosa Drive, Baton Rouge, LA

This is a much more serious post than I generally share, but I feel as so many we impacted including our family and friends it was necessary to take the opportunity to share how our story intertwines with theirs. It really puts life in perspective. The things I called ‘problems’ that I was facing at home or at work, pale in comparison to what these people and families have to face. They have a long road back to ‘normal’.

There are many victims who simply want to rebuild their lives and move on from this disaster, and there are many aids who want no glory for their efforts. However, it is worth mentioning that the aftermath of this devastation and those who truly have made momentous efforts to help those who lost everything restore my faith in humanity in the state of our current world.

Until next time,

Tori

How Does Your Garden Grow?

A couple weekends ago we spent a lot of time working outside ‘spring cleaning’ our yard. It was almost 80 degrees that Sunday and has barely made it upwards of 45 since…it’s also rained just about everyday since.

So, I sat basking in the sun planting my little seeds in a mini-greenhouse. This is the first year I’m going all out, planting a bunch of different things and then actually transplanting them into a garden (which is yet to be built, but we won’t think about that just now.) I have a couple pallets that I plan on disassembling to create a raised garden box, but we ran into a lovely wasp’s nest while clearing the ground where I plan to put it, so that got put on hold for the time-being.

SeedlingPlanter

Moving on, we got permission from the landlord to pull out the small dead palm trees in our front yard. Or at least I thought they were small…until we finally got one dug up and pulled out of the ground. Check out the root bundles on these babies! The first one really wasn’t so bad, the second one however… we went through several different shovels, one of which actually snapped in half, until the Man decided go buy a brand new one which made a world of difference. 5 minutes later it was out.

LandscapeRemoval1

Palm Tree Root Bundle

Crazy root bundle! Have you seen anything like this?!

IMG_3231 (1)

Landscape Redo

We purchased some inexpensive, hardy plants since we didn’t want them dying again. We also removed some thick decorative grass from one side of the front flower bed, for the life of me I can’t figure out why it was there to begin with and it looks so much better without it! Don’t you agree? We still have to put some mulch down but overall the general effect is much better.

Landscape Overhaul Porch

Please ignore my pathetic, dead hanging basket, it will be bright and beautiful as soon as the weather stays warm…and I get around to it.

My little plants are coming along quite nicely! I think I am going to have cucumbers and cantaloupes coming out of my ears though… It seems that my peppers are not doing so hot considering they haven’t sprouted yet. I’m thinking about getting some new seeds and trying again. I dried the seeds I planted from an actual pepper. However, the carrots, beans, and broccoli have no excuse..hopefully they will sprout soon!

Seedlings Planted Growing

From left to right, cucumbers, cantaloupe, beans, broccoli, watermelon, onions, carrots, sweet peppers, green peppers, pimientos, tomatoes, and flowers.

Here’s a little update on the sign that I created and posted here. I revamped it for St. Patrick’s Day! (It’s Christmas decor just wasn’t going to cut it for Spring!)

WelcomeHouseSignShabbyChic

I walked out my back door yesterday to find this, it made my day. It’s March, March and I have a flowering hibiscus on my porch. Maybe it will brighten your day a little too 😉

Hibiscus Grow Flower Bloom

Has anyone else started planting yet or anxious to do so?
That’s all I’ve got for now. Until the next adventure…have a fabulous day!

xo
Tori

The Wait is Over!

I know you have all been impatiently waiting for a new blog post, so here I am. It’s been quite some time since my last post and I wish I had a good excuse for my little hiatus, but sadly, I do not. Instead I have about 592 little excuses that have piled up between then and now (some of which include Christmas & Mardi Gras). I do however have a peek at what I have been up to…

Before Christmas I found this worn, perfectly distressed board in our garage. We don’t currently have house numbers on our house so I saw a great opportunity to remedy that problem and start decorating for Christmas in the process! I drilled 2 holes in the top to put a hanging wire through and bought inexpensive numbers from Home Depot and nailed them to the board. I topped it off with a beautiful striped bow and beaded rope to dress up the hanging wire.

House Numbers Shabby Chic Sign

This turned out better than I imagined, I’m in love with the results!

I’ve also been keeping busy with a couple Etsy orders and handmade Christmas gifts. These blankets are honestly one of the best gifts. My blanket journey began when I made one with the New Orleans Saints for the Military man for Christmas two years ago. He would live under it if I let him. I also made several chevron letters as gifts and a larger set for an Etsy order.

Custom Marine Blanket Fleece Throw

Military blankets turn out to be some of my favorites, I think I may be a little biased 😉 Check out our Etsy site to get one or to take a look at some other options!

Chevron Letter - Welcome Sign

My cousin Emily loved her handmade Christmas gift! (These are also listed on Etsy, just click on the picture!)

Chevron PLAY!

One of my larger Etsy orders. The customer absolutely loved how they turned out. I even got to brush up on my wood burning skills! These will look adorable in a playroom, what do you think?

I’ve also started several larger projects recently (which I hinted at here) and found some great new recipes that I’m excited to share! I promise I will be posting new projects and ideas with much more regularity, join me for the adventure! Talk to you soon!

xo

Tori

Announcement: Etsy Shop Now Open!

Come one, come all to my newly opened Etsy shop!
Browse the items listed and make a purchase, I promise you will not be disappointed! Just for my blog fans here is an introductory 10% off code valid only until this weekend. Use code INTRO10, thanks for shopping!

DIY Chevron Letter

This past weekend, I had a bridal shower to go to and needed a cute, functional, yet inexpensive gift for the bride and groom to-be. I’ve seen tons of letter wreath/swag ideas all over Pinterest, so I went to the craft store to check out my options. I came home with a large, white wooden ‘C’ (which was about $5) and a couple floral pieces. I already had lots of paint at home but if you don’t have it on hand you will want to pick some up, as well as a small foam brush (you can really use any paintbrush, but I’ve found that a foam brush works well.) And then of course, me being me, I forgot to take a picture of my materials pre-crafting, but you will get the idea from the rest of the pictures.

I started by drawing lines and equal distance apart to create the chevron pattern. Make sure you use a pencil with a good eraser for this step. I originally tried to freehand the design and it was WAY more difficult than I had planned. So I drew perpendicular lines with a ruler on the C about 2 or so inches wide and 1 inch tall. Then draw diagonal lines from one corner of each box to the opposite corner. This entire process was trial and error, initially I created a grid that was 1×1 and it was too small so I erased the middle lines which ended working out perfectly.

C Lines 1

Then I taped off the lines with masking tape because that’s what I had handy. The space to cover with tape was just wider than my tape so I had to do a double layer of tape on each edge. Make sure the edges are pressed down firmly so that the paint does not bleed under it. (If you’re me, this may happen anyway but it’s not difficult to fix.)

C Taped

Since the C was already white, the next step is to paint the space that’s left between the tape. I used a baby blue color which is the same color we painted our walls (yes, this was leftover paint for out DIY Painting Adventure!). I did one coat of paint with a foam brush and then left the tape on too long. Make sure you peel the tape off shortly after you paint so it does not peel off with the tape! Mine peeled off in 1 or 2 spots but I was able to correct it with a little extra paint.

C Painting

C After Paint2

I let the paint dry overnight (a couple nights actually since it was a busy week for us). I then used a clear coat of spray paint to seal it so it was more resistant to our lovely Louisiana heat and dampness. I hung it on a hanger outside and went to town with Rust-Oleum Ultra Cover in gloss clear. Then, I let it dry overnight again. You do not have to let it dry this long, but we had a lot going on so it worked for me!

C Clearcoat Paint Can

C Clearcoat

Now it’s time to decorate! I had purchased a pale burgundy, burlap flower and some small white lacey flowers that I found in the wedding aisle. These cost me a total of about $4 (I also used a 20% off your total purchase coupon, every little bit helps!). I arranged the flowers several times before I finally hot glued it onto the C. I may have went a little overboard with the amount of glue I used, but hey..it won’t be coming off anytime soon! I then hot glued a burlap strip (I got this little pack of burlap at Michael’s for $1) to each side of the back top, I secured it again with a small white thumb tack. Didn’t it turn out amazing? It was even better than I was expecting! It turns out the bride and groom to-be absolutely loved it, and were even more excited when they found out that I had made it. Now I just need to make one for our door!

C Burlap

C Final Product Close

A little bit of handmade love and effort can go a long way!

Love the way this turned out, but not interested in making your own? Check out the contact page and contact me to place an order!

xo
Tori

Shabby Plant Stand Makeover

As of late, paint and I have become BFF’s. Free finds begging for a makeover are also in our clique.  We all had a party a couple weeks back and had a fabulous time. I received a planter stand from the Man’s Mama that she found for free and picked up for me! She’s a serious enabler when it comes to my DIY addiction. It was a dark brown wood and in definite need of some sprucing up.

Basket Planter Before

(Notice again my use of grapefruits to keep my drop cloth in place. My offer still stands…does anyone want some? Anyone?)

 Because I planned on using the stand outside, I just used some basic white satin, Rust-Oleum spray paint that I had on hand and gave it a good coating. It adheres well to wood and plastic, so it was a good option.

Planter Spray Paint

Because the wood was so dark, it ended up needing 2 coats. I painted the bottom half, let it dry and then flipped it over to paint the top. I had to give the basket part a couple more coats to get into all the cracks and crevices. While it was drying I went to a local greenhouse and bought some beautiful red-orange Gerber Daisies, they’re one of my all-time favorites. Here is what the final product looked like! She has great legs, don’t you think?

Basket Planter After

So before you throw that old stand or planter out, try giving it some new life with a bright coat of paint. You’ll be amazed at the transformation! A bright, bold color would really transform this kind of piece and add a pop of color to your space. In this case I wanted to use white because of the colors on our porch. The white stands out and creates a cohesive look with the furniture, in the future I would love to paint it a bright aqua/teal color!

Basket Planter Compare

Don’t forget to pin this for DIY inspiration!
Stay tuned for my next project, I promise you won’t be disappointed with this one!
(Hint: I’ll be painting some tough surfaces!) xo

-Tori

DIY Dollar Store Planters

DIY Planters Edited

This spring I did A LOT of work outside now that we have a really cute backyard. I didn’t want to put too much work into it or spend much since it’s a rental and we can’t exactly take it with us when we move again. But I definitely want to enjoy it with friends and family while we’re here.

So I started by mending the fencing that encloses our yard, there were a lot of nails and boards sticking out so I used some extra screws to put them back in their proper place! I did have a little mishap with the hammer while trying to remove the nails though. I guess I’m stronger than I thought – much stronger…

Hammer Pic
Do things like this happen to other people,
or am I just that lucky?

There was also a space in the back corner of the yard that looked like it had, at one point, been a flower bed? Well when we moved in it was the hairy armpit of the yard, so I went to town weeding the entire thing. I will say it was very therapeutic, I haven’t done a ton of gardening before (apart from mowing the lawn) so working in the sun and dirt was really peaceful. Until about 5 minutes in when I started sweating profusely in the southern Louisiana sun. Overall though, still enjoyable.

Flower Bed Before1

I really wanted to add some height to the flower bed when… lo and behold I found some wrought iron plant hangers when I was cleaning it out! Pretty awesome find in my book, especially considering I didn’t want to spend much 😉 then I just needed some pretty planters to hang on them! So, to the Dollar Tree I went to see what I could find. All I could find was these plain boring grey ones, but I figured a little spray paint would transform them into exactly what I was looking for. I bought 3 of them which cost $3. Score!

Planters-Before

I took off the rope before I spray painted them a light aqua/sky blue color that I had left over from a previous filing cabinet overhaul. You may need to use a pair of pliers to pinch the little metal pieces together that hold the rope in, I did…after I pinched my fingers a couple times first.

planters-painting

I spray painted the bottoms, let them dry, flipped them over, spray painted and let them dry again. I then filled them with potting soil and one of my favorite flowers, the Gerber Daisy, in red for a fun pop of color J (You’ll notice my use of grapefruits to hold down the drop cloth I used to paint on, yes grapefruits! We have a huge grapefruit tree that is about to produce more grapefruits than we will ever be able to consume, anyone want some?)

Flower

The white trellis along the fence, I found lying next to our house and stuck it here. It brightens up the flower bed and adds great contrast but it’s not perfect because the fence and ground is so uneven in this back corner.

flower-bed-after

The overall results really were fantastic considering the lack of money I spent. There are a lot of other things I would love to take on if we owned the property, but for now I’ll take it!

Thanks for stopping by! xo

DIY Painting Adventures

This past weekend was full of little projects around the house, until Sunday when my man was off and we finally got the guts to take on a painting project. Yes, my friends, paint. I’ve been daydreaming about brightening up our dark, dreary walls with the perfect pale aqua color to match our duvet. We currently live in a rental, but the landlord agreed to split the cost of paint with us so we decided to go for it since we will *hopefully* be staying put for a while. All the furniture in our bedroom is hand-me-down from family members that I was given when I started college (I have future project plans for these too!). So I am slowly but surely making these pieces our own. But anyway, back to the project at hand (see I’m already daydreaming about my future projects, no wonder I start 5 things at once!). Paint, back to paint. We started with a really dark and dreary tan paint color when we moved in. Here is the bedroom before we began the painting process, kind of dull right?

Before
I bought a sample of a color we picked out called ‘Lagoon Green.’ (Samples are only about $3 so you aren’t out much if you don’t like it.) I really like the sample section I did on the wall, but as it turns out the paint looks MUCH different when it’s on ALL the walls… Paint Sample
Wall Sample
I also purchased spackle and went to town on the 27 hundred holes that were in our walls. I did this the day before we started painting to give it a good head start on the drying process. We then removed all the outlet and light switch covers and taped off the window and door moldings. Then the painting began, the man did the trim while I did the roller. We used Glidden Duo Paint + Primer ironically called “Lagoon Green”. (You’ll see the irony in the final product photo.) We also ended up having to do 2 coats of paint because the dark tan on the walls did not cover well with the first coat. As you can see the final product is much more of a sky or baby blue than any kind of “Lagoon Green”. It was meant to be a very pale aqua/teal color, but Glidden failed us on this one.

After Paint

We’re still proud of the result, and the space feels much more inviting and soothing now. We made it our own, which is not always the easiest thing to do in a rental property. I still have some decorating and finishing details to do on the room so it’s a work in progress. Next on my to-do list are those hand-me-down dressers!

After Paint Collage

Do you have any tips or tricks to make a rental your own, or to breathe life into an old space?

Thanks for stopping by, stay tuned for our next project! Don’t forget to subscribe for more tutorials, ideas, & transformations!

Spaghetti Bread Tutorial

Spaghetti Bread Edited

At about this point in the week we’re all looking for a quick, easy, and of course delicious, meal. Since it’s such a huge hit in our household, I figured I would share a fantastic recipe for leftover spaghetti. I’m all for leftovers but for some reason, leftover spaghetti is never as good the for me the second time around. So, I found this recipe and have had rave reviews from my family! (The fact that it’s super simple and inexpensive doesn’t hurt either.)

What you’ll need:
Leftover spaghetti & sauce
1 loaf frozen bread dough
Mozzarella cheese
Garlic Butter
Basil

Before leaving for the day or about 4 to 5 hours before you plan to make the Spaghetti Bread, take the frozen bread dough out of the freezer and put it on the counter or in the fridge. If you take it out in the morning I would recommend putting it in the fridge so it doesn’t rise too much.

1. Preheat oven to 350 degrees.
2. Make sure you have a clean work space. Spread some flour on the counter as well as on the rolling pin so the dough doesn’t stick (or use parchment paper).
3. Roll the dough out to be about 12×16 so that it will fit on a baking sheet.
4. If you haven’t already, mix sauce with Spaghetti and place spaghetti in a strip down the middle of the dough no more than 4 inches wide.
5. Grate mozzarella cheese and spread over spaghetti. (Use as much as you want, you can never have too much cheese!)
At this point, your spaghetti bread should look something like this:

SB 1

6. Now cut approximately 1/2 inch strips all the way around the dough.

SB2

7. Braid the strips right over left, left over right all the way down the loaf and tuck in the ends. (This is definitely not the prettiest loaf of spaghetti bread I’ve ever made, but it’s makes up for that in taste!)

SB3

8. Spread garlic butter on the top of the dough and sprinkle basil on top of that. (You can use regular butter or egg whites and add some garlic powder or Parmesan cheese as well.)
9. Bake at 350 for approximately 30 minutes or until golden brown. Let cool before slicing, slice & enjoy!

SB4

Hope you enjoy this recipe as much as we do! My fiancé liked it so much we had absolutely no leftovers last night, I think I had 3 pieces and he ate the rest. (After all he’s a 6’4, 24 year old, ‘growing’ boy right?)

Please let me know if you have any questions about the recipe and I’ll be glad to help. Bon Appétit!

Thanks for stopping by, don’t forget to subscribe to the blog for more great updates and ideas!

Pinwheel Project Progress

More progress on my pinwheel project, (as I have decided to dub it). I dragged my man to the store last night to help me find DIY fabric buttons, and he turned out to be quite helpful. Ok, I didn’t actually drag him, he volunteered. The buttons shown in the picture are actually made out of a traditional grey bandanna, which is going to work really well on future endeavors with this project! I’m hoping to have at least one of these wheels done tonight, life permitting. I never know what is going to happen when I get home from work, but here’s to hoping!

You won’t believe how easy these are to make. Once I finish one and work out all the kinks, I’ll post a tutorial with the link to the original pattern that I used (of course I must give credit where credit is due!). I’ve been having a lot of fun with this project and love putting colors together to create totally different looks! The black, lavender, and grey theme was extremely nice fabric my grandma decided she didn’t want (she has an entire walk in closet of fabric at their farm-house in NY, I go ‘shopping’ there whenever I’m home.) Is it still considered shopping if it’s free? She is an amazing quilter/crafter, which she passed on to my Mom. I have some pretty awesome genes! Stay tuned for the tutorial and to see the final product.

Image

Check me out on Twitter @SewCrazyLiving & on Instagram @woodtoria!

Have a fantastic Tuesday!